

知人に作ってほしいアプリがあると言われ、動画を見せてもらう。。。
ま、ま、まさかっっ!?!?!? [C#]でも[Selenium]がつかえるのか!?
という事で、今回はSeleniumをC#で使えるようになるまでの環境構築の備忘録です。
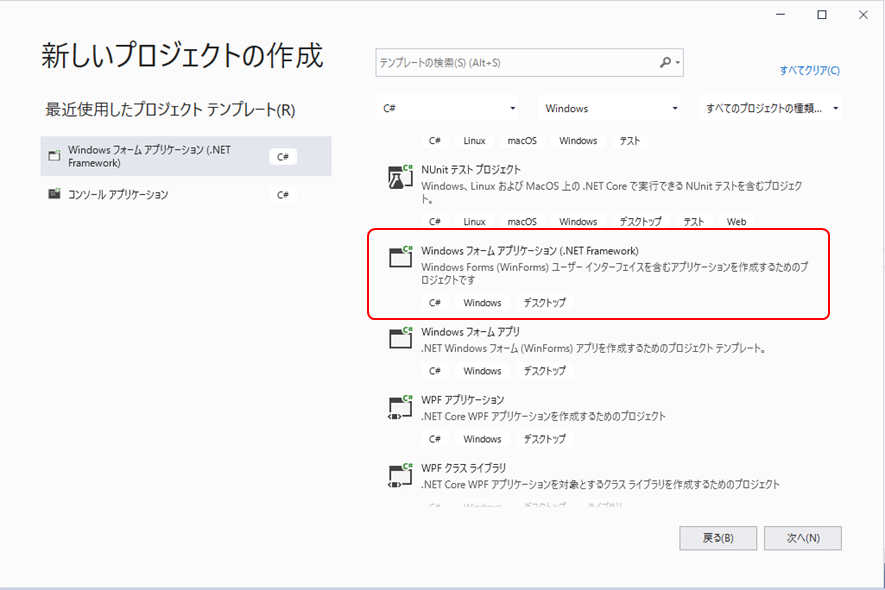
プロジェクトを作成する
いつものことながら、「Windows Form Application (.NET Framework)」を作成しましょう。
※コンソールアプリケーションでも問題はありません。
適当にプロジェクト名と保存するパスを指定する
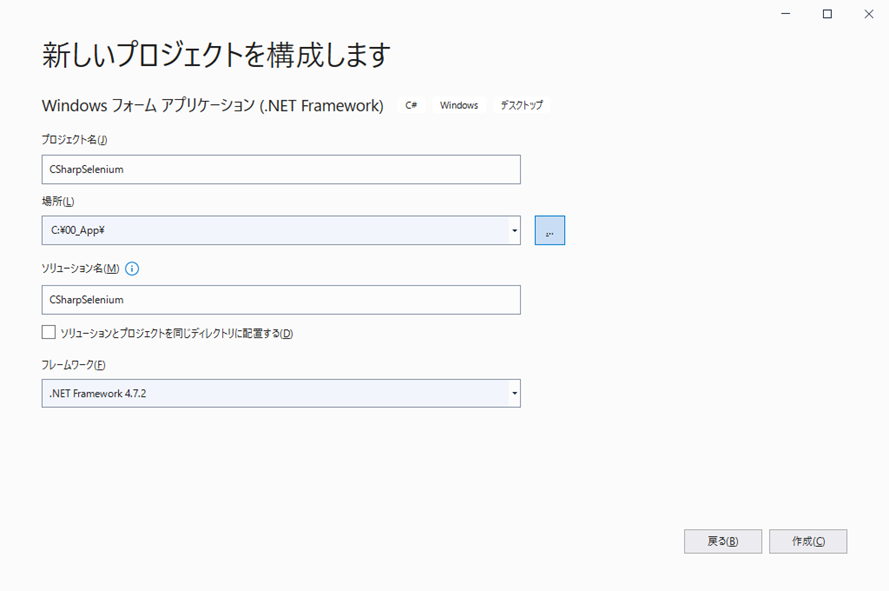
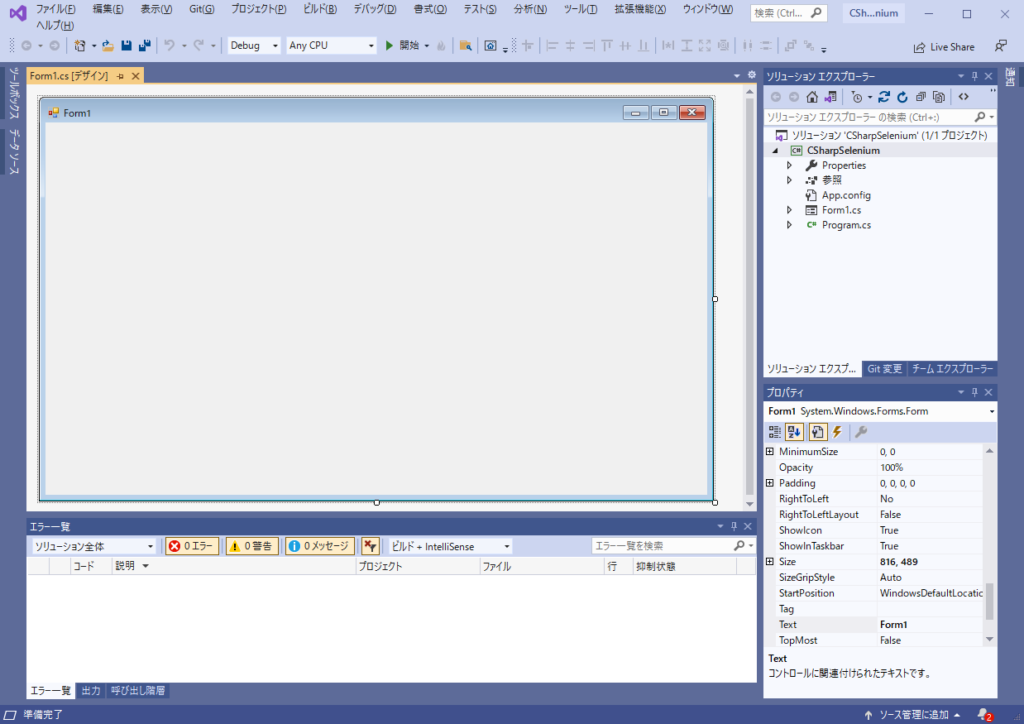
【作成】を押すと最低限のプログラムが作成されます。
Seleniumをインストールする(WebDriver)
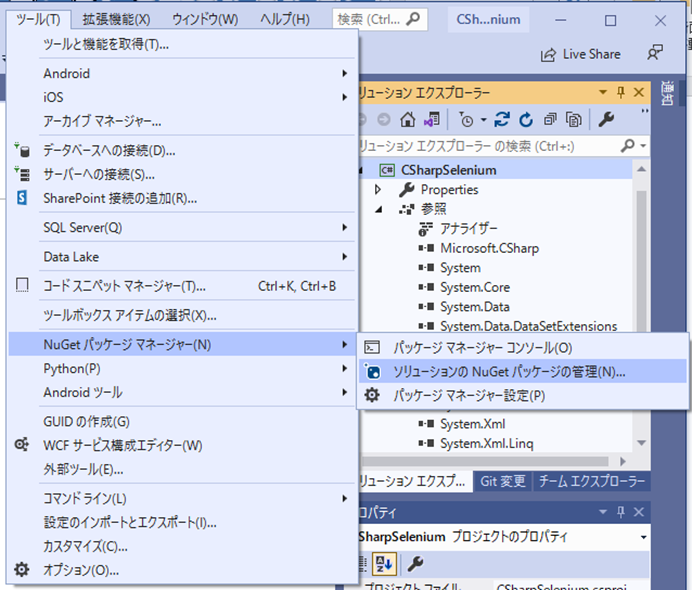
次に、プロジェクトにSeleniumをインストールします。
【ツール】→【NuGet パッケージ マネージャー】→【ソリューションの NuGet パッケージの管理】
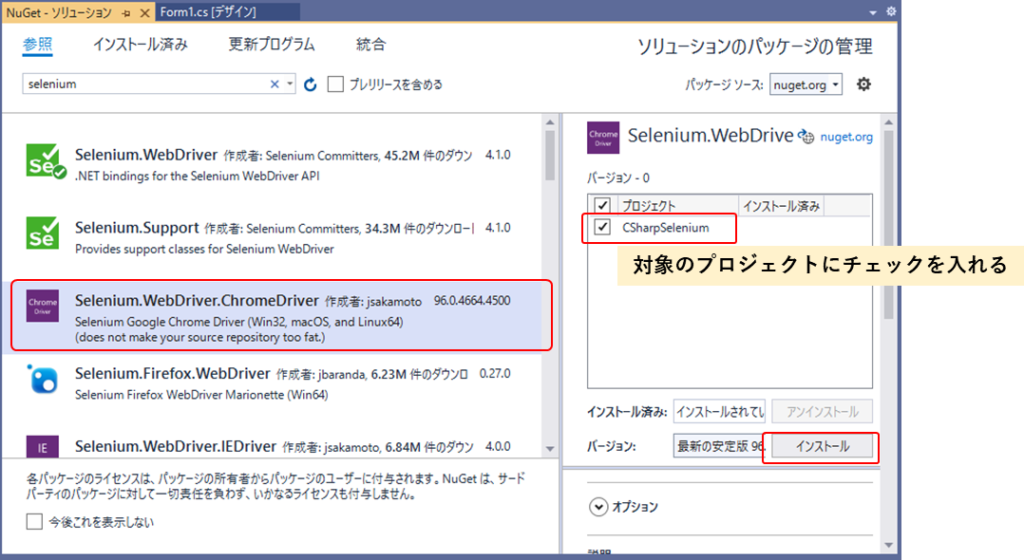
Tab[NuGet – ソリューション] →【参照】→ [検索]に「selenium」と入力する。
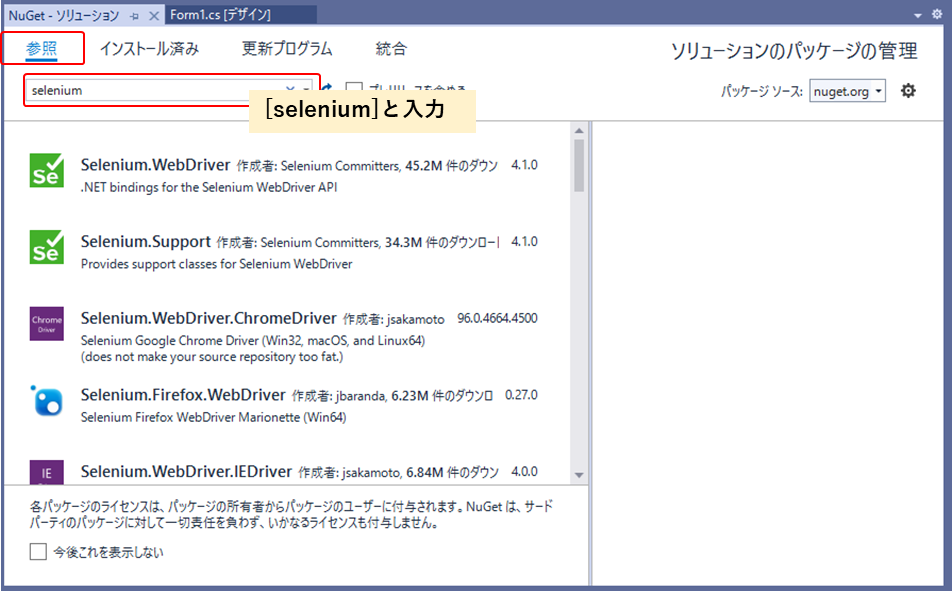
次に「Selenium.WebDriver」をインストールする。
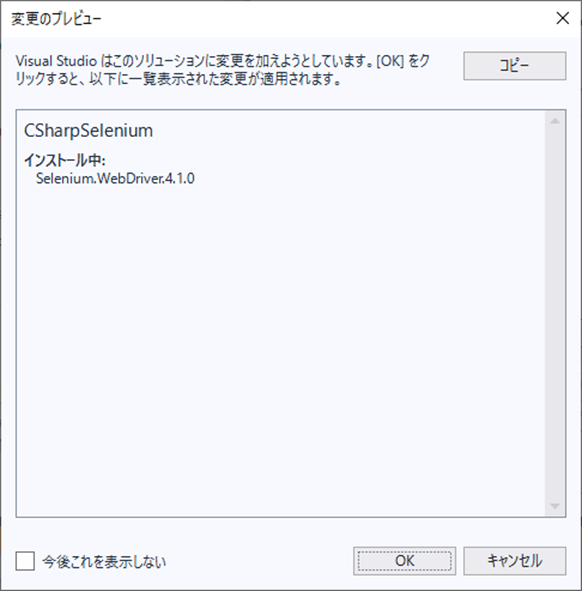
対象のプロジェクトにチェックを入れて、【インストール】をクリックする

表示されない人もいるかもしれないけど、下記が表示されたら【OK】をクリックする。
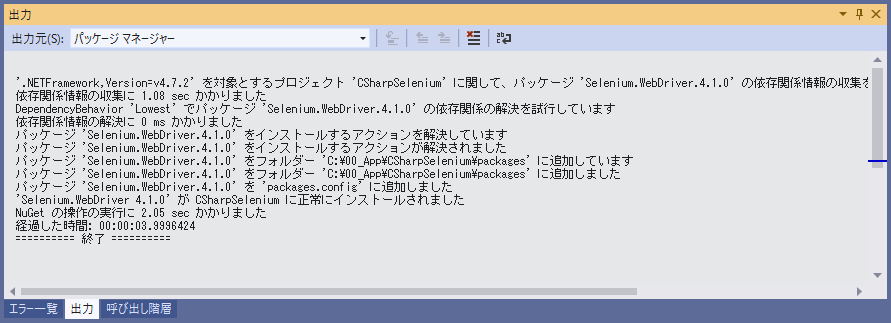
出力のタブに「====== 終了 =======」が表示されれば、インストール完了
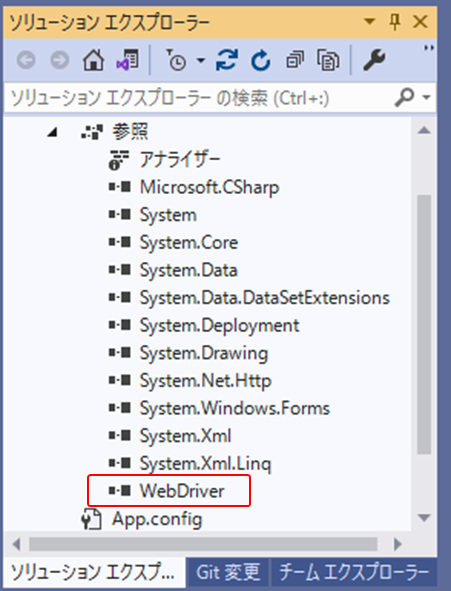
インストールが完了すると、ソリューションエクスプローラーの参照に[WebDriver]が追加される。
Seleniumをインストールする(WebDriver.ChromeDriver)
今回は【Google Chrome】を操作していきたいので、Chromeのドライバーをインストールします。
先ほどと同様に NuGet ソリューション から「selenium」を検索します。
そして、「Selenium.WebDriver.ChromeDriver」をインストールします。
※今回は、 ソリューションエクスプローラーの参照に追加されない。
実際に使ってみる
環境を構築できたので、簡単に実施してみたいと思います。
忘れてはいけないのが、使用するネームスペース( NameSpace )のusingです。

using OpenQA.Selenium;
using OpenQA.Selenium.Chrome;
上記二つを追加しよう!!
★下記、20220612追記★
そして、フォーム内で使える変数を定義します。
private IWebDriver _WebDriver;
Googleにアクセス(指定のURLに移動する)
流れとしては、WebDriverのインスタンスがあれば、いったん開放して、再度インスタンスの生成。
そして、URLにアクセスする。
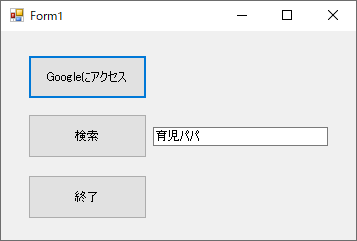
【Googleにアクセス】をクリックしたときの処理を紹介します。
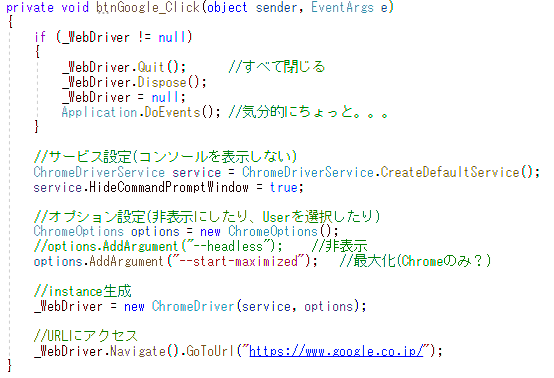
private void btnGoogle_Click(object sender, EventArgs e)
{
    if (_WebDriver != null)
    {
        _WebDriver.Quit();      //すべて閉じる
        _WebDriver.Dispose();
        _WebDriver = null;
        Application.DoEvents(); //気分的にちょっと。。。
    }

    //サービス設定(コンソールを表示しない)
    ChromeDriverService service = ChromeDriverService.CreateDefaultService();
    service.HideCommandPromptWindow = true;

    //オプション設定(非表示にしたり、Userを選択したり)
    ChromeOptions options = new ChromeOptions();
    //options.AddArgument("--headless");    //非表示
    options.AddArgument("--start-maximized");   //最大化(Chromeのみ?)

    //instance生成
    _WebDriver = new ChromeDriver(service, options);

    //URLにアクセス
    _WebDriver.Navigate().GoToUrl("https://www.google.co.jp/");
}
Googleの検索を行う
【検索】ボタンをクリックされたら、横にあるテキストボックスの内容をGoogleの検索欄に記入し、検索をかける。
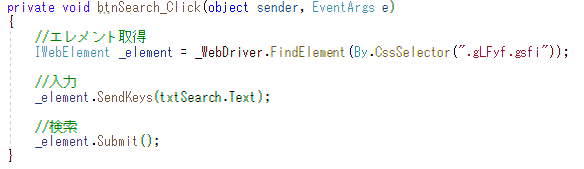
private void btnSearch_Click(object sender, EventArgs e)
{
    //エレメント取得
    IWebElement _element = _WebDriver.FindElement(By.CssSelector(".gLFyf.gsfi"));

    //入力
    _element.SendKeys(txtSearch.Text);

    //検索
    _element.Submit();
}
今回は、詳細の説明は省きますが、FindElement関数を使って、エレメント( Element )を取得して、エレメントに対して適切な処理を行う。
Selenium終了処理
【終了】ボタンを押した時の処理を紹介する。
ちゃんとSeleniumを終了させないとChromeが起動し続けている為、しっかりとインスタンスの開放を行う事。
この処理は、起動時にインスタンスがあった時に行っていた処理と同じです。
※関数にした方がいいですが、今回は書きます。
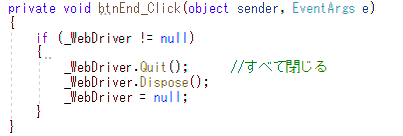
private void btnEnd_Click(object sender, EventArgs e)
{
    if (_WebDriver != null)
    {
        _WebDriver.Quit();      //すべて閉じる
        _WebDriver.Dispose();
        _WebDriver = null;
    }
}
Quit関数で、表示しているChromeのウィンドウをすべて閉じます。
Dispose関数で開放します。
ウィンドウが閉じる時の処理
最後に気にすべきことがあります。それは、ウィンドウを閉じる時です。
この時も【終了】ボタンと同じ処理が走るようにしましょう。
※何度も言いますが、関数にした方がいいですw
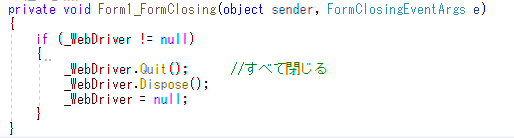
private void Form1_FormClosing(object sender, FormClosingEventArgs e)
{
    if (_WebDriver != null)
    {
        _WebDriver.Quit();      //すべて閉じる
        _WebDriver.Dispose();
        _WebDriver = null;
    }
}
さいごに
C#でSeleniumをやってみました。
NuGetからパッケージのインストールを行うと今まで出来なかったことが出来るようになるので、楽しくなりますね!!!!
次回は、このSeleniumを使ってKeepaのログインを作りたいと思います。
業務でプログラミング(C#/VB/Python)を作っている。
挫折を何回も繰り返し、幾度の壁を乗り越えてきた。
乗り越えてきた事を忘れないように記録に残す。
同じ思いをしている人への情報提供になれたらと思う。
基本は初心者に向けたプログラムの情報を提供する。


コメント